Well, whaddya know? I no sooner post my Star Book photos and TV Weekly are giving out the instructions. I made my book in 2006, and there you go. It looks much the same. I will have to go check out what sort of glue she is using to make it.
What I like about the TV Weekly is that it is video based, they make it interesting and show you how to do it. I have done a few things from their shows. Very slick and professional.
cheers ...

Monday, May 26, 2008

Sunday, May 25, 2008
Star Book ...
I love making books. Books that are glued or books that are sewn or books that are a combination of both. I also like folded books, such as a maze book or concertina book. Today I am going to show you my Star Book.

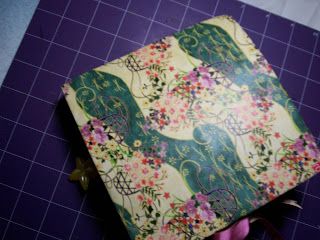
Okay, this is the cover. The paper was downloaded from the Canon site and was just so pretty.
 The handsewn spine. I just used crochet cotton; but I used a cradle to mark all the holes. I have seen these made with a Zutter punch and wire spine, but it didn't look as good as the effect you get from handsewing.

Okay, this is the cover. The paper was downloaded from the Canon site and was just so pretty.
The handsewn spine. I just used crochet cotton; but I used a cradle to mark all the holes. I have seen these made with a Zutter punch and wire spine, but it didn't look as good as the effect you get from handsewing.The first open pages. The picture on the blue square is a gold stamp image.

Here I have cut out a frame on the left hand side and inserted a photograph. On the right hand are two tiny frames that have floral stickers to add a little focus. (Sorry the camera strap dropped down).

This is the tiled page stamped with my dragonfly art stamp and embossed. Opposite is an acrylic pocket with a tag. The tag top has beads and embellishments tied to it.


 This is the last page. The tied thing on the back cover is a mini book. It has pages, but nothing in it just yet. I still have one or two small things to do to the book.
I think everyone should try at least one. This was the second one I made. The only problem I have had with it, is that the glue between the pages doesn't hold too well. It is quite heavy and I think this may be the cause. I will keep experimenting.
adieu ...
Saturday, March 22, 2008
Adhesives, glue and other sticky stuff ...
As a horselover as a child, certain adults thought it would be helpful to inform me that dead horses got sent to the glue factory. The upshot of this was when I was starting school, when we had to glue and paste, I would become distraught at the sight of the Clag bottle and immediately burst into tears. My teacher would make up flour and water paste for me to use instead. It wasn't till I was in my teens that I found out this little myth was just adult humour.
I will not use this space here to discuss the rendering of animal parts into glue. In fact these days, I am not sure those of us in the West use rendered animal parts as glue, but use a petro chemical by product or something.
My first choice in adhesives are double sided cassette tapes. These are usually well made and not overly expensive and by and large do the job required. If I need something stronger, I use a clear liquid glue. Other adhesives I like are my sticker machines which are also fun.
I do not like stick glues. Stick glues always dry out and do not adhere after a period of time, usually less that a year. I have used several different brands and have found this to be true of all of them. I like the idea of a stick glue, and they are certainly the most inexpensive, but their longevity is not the best. When I want something stuck, unless I use repositionable tape, then I want it stuck forever.
When cutting an item that has been glued or even a glue tape with a removeable backing, first coat your scissors with versamark liquid from a stamp pad or pen. The versamark is easily removed later by wiping with a baby wipe.
I am sceptical about the "acid free" status of glues. What would be in a glue that made it acidic in the first place?
Will update soon ...
I will not use this space here to discuss the rendering of animal parts into glue. In fact these days, I am not sure those of us in the West use rendered animal parts as glue, but use a petro chemical by product or something.
My first choice in adhesives are double sided cassette tapes. These are usually well made and not overly expensive and by and large do the job required. If I need something stronger, I use a clear liquid glue. Other adhesives I like are my sticker machines which are also fun.
I do not like stick glues. Stick glues always dry out and do not adhere after a period of time, usually less that a year. I have used several different brands and have found this to be true of all of them. I like the idea of a stick glue, and they are certainly the most inexpensive, but their longevity is not the best. When I want something stuck, unless I use repositionable tape, then I want it stuck forever.
When cutting an item that has been glued or even a glue tape with a removeable backing, first coat your scissors with versamark liquid from a stamp pad or pen. The versamark is easily removed later by wiping with a baby wipe.
I am sceptical about the "acid free" status of glues. What would be in a glue that made it acidic in the first place?
Will update soon ...
Friday, March 7, 2008
Taking the time ...
When you see something like the Wedding Album below, or other finished pieces of work, you have to realise that there has been much time spent in doing the item. I am talking years. You cannot just sit down one morning and say "I am going to make xxx". I cannot make a saddle, nor for that matter a bridle - I understand the concepts behind making them and as a horselover I would love to be able to - but apart from not having the tools to do so, I do not have the skills either. And it is the gaining of the skills in the first place that you require in order to make anything worthwhile.
The Album came about because I spent almost one or two nights per week for a year going to classes at a scrapbook shop learning the basics. I have books and magazines that I have used articles from, to experiment with various products to suppliment what I learnt at the scrapbooking shop. I have taken the money and invested it in the finest tools so that I have both the tools and skill to do this. But having said that, one of the skills that an artist has to have is a sense of colour.
When I first came up with the idea of the Album, knowing Kylie's dress was going to be blue, I had thought of matching the colour and using plain blue paper and stamping it and embellishing it in other ways, but still with the pieces torn and placed on each side of the pages. It was my daughter (who has also done much as I have with scrapbooking and paper arts) who suggested the yellow for the matting. Again it too is a different yellow from the frangipani flower centres too. But these colours work. They work because they are a whole. They go with the pictures, they are very modern and they are very beautiful. They are whole.
Each page is made from a single piece of card stock, cut to 12 inches by 11 1/2 inches. The extra half inch on the edge of the page is for the binding combs. So each page had to be moved in by this half inch. The back of this half inch border is re-inforced by another strip of cardstock so that when the album is open, there is enough strength at the hole for it not to tear. So in effect what has happened is that I have designed the pages for 11 1/2 inches by 11 1/2 inches.
I took the time to have the pictures developed in a lab rather than print them out on photo stock paper myself. My printing skills in this area are not the best, and as I know this, to do the album justice, the extra money I spent doing this has resulted in beautiful pictures.
Overall, it has been a fairly expensive project - it was a gift to the bride as a wedding present. Kylie is a lovely lady and she has married her dream beau, I thought she deserved something special to remember her special day. I could offer to make this album because I knew I had the skills, knowledge and tools to do it justice. Serendipity helps too, because I was looking for other papers when I discovered those lovely papers that I ended up using.
The Album came about because I spent almost one or two nights per week for a year going to classes at a scrapbook shop learning the basics. I have books and magazines that I have used articles from, to experiment with various products to suppliment what I learnt at the scrapbooking shop. I have taken the money and invested it in the finest tools so that I have both the tools and skill to do this. But having said that, one of the skills that an artist has to have is a sense of colour.
When I first came up with the idea of the Album, knowing Kylie's dress was going to be blue, I had thought of matching the colour and using plain blue paper and stamping it and embellishing it in other ways, but still with the pieces torn and placed on each side of the pages. It was my daughter (who has also done much as I have with scrapbooking and paper arts) who suggested the yellow for the matting. Again it too is a different yellow from the frangipani flower centres too. But these colours work. They work because they are a whole. They go with the pictures, they are very modern and they are very beautiful. They are whole.
Each page is made from a single piece of card stock, cut to 12 inches by 11 1/2 inches. The extra half inch on the edge of the page is for the binding combs. So each page had to be moved in by this half inch. The back of this half inch border is re-inforced by another strip of cardstock so that when the album is open, there is enough strength at the hole for it not to tear. So in effect what has happened is that I have designed the pages for 11 1/2 inches by 11 1/2 inches.
I took the time to have the pictures developed in a lab rather than print them out on photo stock paper myself. My printing skills in this area are not the best, and as I know this, to do the album justice, the extra money I spent doing this has resulted in beautiful pictures.
Overall, it has been a fairly expensive project - it was a gift to the bride as a wedding present. Kylie is a lovely lady and she has married her dream beau, I thought she deserved something special to remember her special day. I could offer to make this album because I knew I had the skills, knowledge and tools to do it justice. Serendipity helps too, because I was looking for other papers when I discovered those lovely papers that I ended up using.
Wednesday, February 27, 2008
Still here ...
I am still here. I have been trying to upload some photos that seem to not want uploading. I will look at them again on the weekend and see if I can figure what is wrong. I have some things to show you including my TIF piece. So if all goes well I will back on the weekend.
Monday, February 11, 2008
A little to share ...
Well, I did promise to share some photos of the Wedding Album I am making for the lady at work as her wedding gift. I am not the best photographer nor am I the best scrapbooker, but she is pleased with it. It is by no means finished. I put it together so that she could see the theme that I had used throughout.
I thought going off to Vanuatu to get married extremely romantic, so I have tried to keep the basic theme going. But I tried to keep in mind that they are a bit older couple who have been living together for a while and didn't want the expense or stress of a big wedding with a million guests.
I found the papers in my local scrapbook shop and the cardstock is Bazzil (?sp).
 A joint page. When you see the next picture, it demonstrates that the two individual photos open so that some journalling can be added.


The Wedding Ceremony page. I used stamps and cutouts to highlight it. The facing page also has the cutouts.

A dimensional paper frame for the Certificate.
 The inside back cover has a holder for the disc with all the photos on it. I used two punches to make the hearts and ran them through the sticker machine.
I thought going off to Vanuatu to get married extremely romantic, so I have tried to keep the basic theme going. But I tried to keep in mind that they are a bit older couple who have been living together for a while and didn't want the expense or stress of a big wedding with a million guests.
I found the papers in my local scrapbook shop and the cardstock is Bazzil (?sp).
 the Cover - a small metal frame with a cutsie dimensional sticker in it.

The first page - I laminated a little map I downloaded.

Detail of the cross stitch palm tree - the slippers were also cross stitched. There is another tree later in the Album as well.

His Page - it needs something
 Her Page - the shiny things are little rhinestones in a spiral with rays coming off them. I liked the effect it gave. But this also needs a little more.
A joint page. When you see the next picture, it demonstrates that the two individual photos open so that some journalling can be added.The Wedding Ceremony page. I used stamps and cutouts to highlight it. The facing page also has the cutouts.
A dimensional paper frame for the Certificate.
The inside back cover has a holder for the disc with all the photos on it. I used two punches to make the hearts and ran them through the sticker machine. There are 16 pages in all back and front. Each page was started with a 1.25cm (0.5") margin so that I could use the Bind-it-All. The covers are chipboard. I glued a thin strip of paper over each outer edge, the used a sheet of the paper as the cover. Inside I glued a sheet of the card stock. I am hoping to maybe make a box for it.
I am pleased with the colours. I wasn't sure when I first saw them but DD suggested using the creamy yellow matts and lettering which has set it off nicely. I think I will look around for some gold or copper coloured metal embellishments and see how they will look. I felt it best not to get too arty farty with it.
At least it isn't Cheech and Chong ...
Sunday, February 3, 2008
Good news, bad news ....
The good news is that the lady for whom I did the Wedding Album for was very pleased with it. Which is a great relief. So now I can finish it off, over the next few weeks. I have some photos.
The bad news is that due to the weather being inclement, I have not been able to blog at all because my laptop will not pick up a signal and DD has had to use hers so the GS's can use the X-box while the weather is bad.
So next weekend will have to be it.
The bad news is that due to the weather being inclement, I have not been able to blog at all because my laptop will not pick up a signal and DD has had to use hers so the GS's can use the X-box while the weather is bad.
So next weekend will have to be it.
Subscribe to:
Posts (Atom)